Search This Blog

Saturday, October 9, 2010

Part II: DIY scarecrow how-to...


So, here's the how-to on the scarecrows. It's pretty simple. You'll need a few items:
-Two pieces of wood for each scarecrow. One for the body (however tall you want the scarecrow, plus 8" to 1' of space to drive into the ground. I use all kinds of wood- fencing, broken broom handles, garden stakes from Home Depot; we use them all.) and one for the arms (shorter than the one you use for the body-  2 feet long will do it).
-Nails and a hammer
-Fabric for the heads (I use felt, myself. Any fabric can be used, though. You can hot glue felt or any other fabric with some nap. If you use muslin or another cotton, you'll need to sew it). We use sort of an off-white felt; you'll also need scraps of other colors or some paint (acrylic or fabric both work fine) for facial features. Any polyester felt you get at the craft store is great and it won't fade or bleed. Do NOT use wool felt; it does bleed. Long story.
-Cast-off clothes (I let each kid pick out what they want, with the reminder that whatever they use will be close to ruined due to rain, sun damage, etc.), hats, scarves, whatever else you want. 
-Stuffing. We've used a variety of materials over the years. Fiberfill (pillow stuffing), leaves, even crumpled newspaper work great, as long as they're encased in something waterproof (I use target plastic bags and tie them, put them in tie side down). You just don't want your stuffing getting soggy...
-Hot glue gun or sewing machine.

How to assemble:
1. Nail the two pieces of wood together in a cross formation. Here's a photo of one scarecrow, with only the skirt attached. I get all the scarecrow frames assembled on the front lawn before I start dressing and putting them in the ground. I always feel a bit self-conscious because it looks like I'm getting ready to burn some crosses on our lawn or something. So I try to do this part as quickly as possible.

2. Dress the bottom half of your scarecrow BEFORE you drive it into the ground. You can get away with dressing the top half once it's in the ground, but the bottom half won't work. I've tried this a lot of different ways, but the simplest is to drive a nail (or use a staple gun) through the pants/skirt; make sure the shirt is long enough to meet the pants where you want it to, before you nail them on. 
3. Dress the top half. Slip one sleeve on (and shirt over the head if you need to) and then it usually takes a bit of forcing to get that second sleeve on.
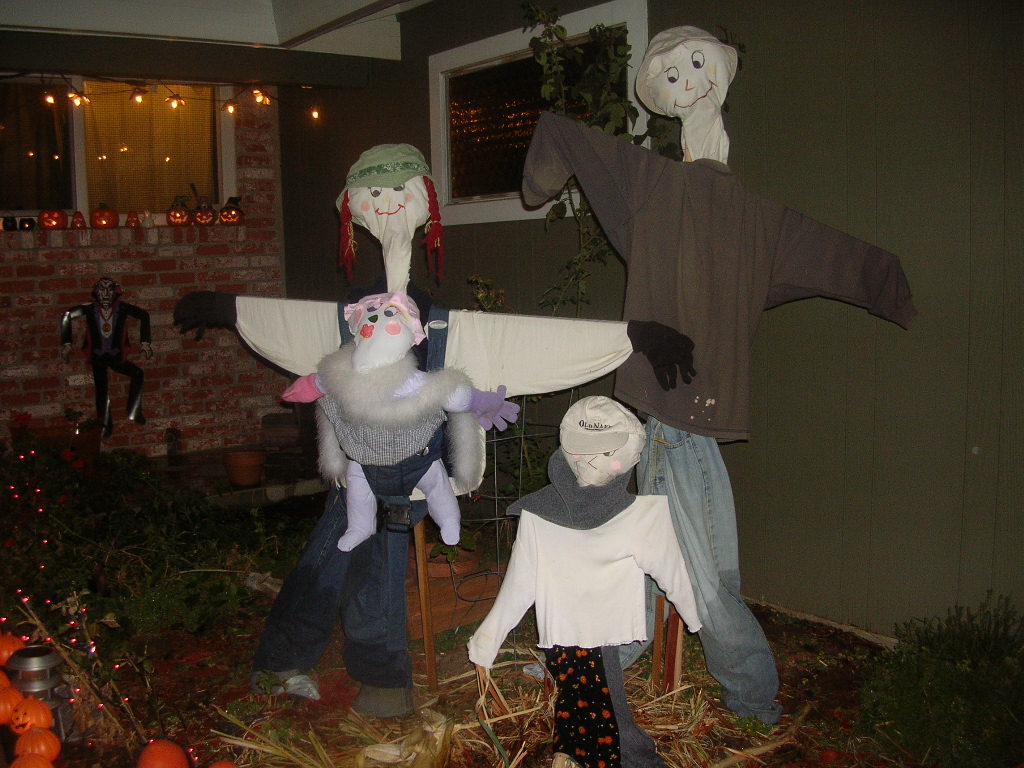
I used navy blue felt this year for the heads, only because I wanted the shape of the skulls to stand out against the dark background. Most years, I use skin-tone felt...and store the heads from year to year.
4. Make the heads. I trace around dinner plates (cutting a bit inside the circle for kid-sized heads), then leave a bit of skinnier 'neck' space at the bottom to tuck into the shirt and hide your wood cross-piece. I glue them, leaving enough space at the bottom to fit my hand in to stuff the head. I stuff them lightly- just enough to give them shape. If you try to stuff them too much, the facial features get all misshapen. Then do your facial features. There are so many ways you can do this- one suggestion I have is to google 'scarecrow' images  and copy some facial features that you like the looks of. That's what I did for our Day of the Dead ones. Leave the bottom of the head/neck open- that's how you're going to put it on the top of the stake. What works best for me is to feel inside the head and bring the stuffing to the front of the scarecrow, putting the stick part at the back of the head. They usually slip on there pretty easily.
My husband wants it noted: he does not actually have a blue and green sequined mustache. I have taken artistic license, here.

5. Finishing touches: hats, scarves, we've put gardening tools in their 'hands' (usually I just stick random gloves on the ends of the sticks to make hands), fake flowers in their pockets, a parrot on the shoulder? This is where the found object thing comes in- think creatively about the junk you have lying around the house and how it can be used.


For our Day of the Dead scarecrows, if you look closely, you can see that I used dollar store pompoms, leftover Christmas ribbon, fake flowers that have seen better days (I asked around and a friend of mine donated some flowers she was about to throw away. Score!), and even some of the flowery facial features are foam shapes from one of those Michaels' tub-o-foamy shapes. The theme was 'Hawaiian', I believe, and I just didn't punch out the little holes in the hibiscus flowers. And they really were perfect here. My scarecrows are not finished, in fact...some are still missing their headwear, some faces have yet to be embellished with sequins and beads, etc. But I wanted to get this post finished so people who are interested can start working on their scarecrows.

Most years, I can get the scarecrows done in a day or two-maybe two to three hours, total. That includes time for the kids to help get their clothes together, work on their faces if they're old enough, etc. The first year will be the hardest; you can just store the heads and frames year-to-year, which cuts down on the time. This is a project that is so worth it- and I hope that of all the wacky projects we do, my kids really remember this one.

One note- If you have any questions at all about these directions, feel free to leave a comment and I will surely get back to you. Next year I plan to make scarecrow heads in different styles and put them in my etsy and ebay shops. If having me make some for you this year is something that interests you, let me know. I can get them made and in the mail in just a few days.


.

An ever-expanding family of scarecrows...Part I


 One family tradition we have is that we make scarecrows every Autumn. We started maybe five or six years ago, when we had just one child. We've added a new scarecrow (or a pregnant scarecrow!) practically every year since. Last year, with a newborn baby and three other kids six and under, I just didn't quite make it in the scarecrow department. But this year we are back...with a vengeance.

Normally, we do run-of-the mill scarecrows...hats, regular clothes, happy smiles, the whole nine yards. The only stipulation is that each scarecrow looks as close as possible to its real-person equivalent in color of hair, eyes and use of that person's cast-off clothes. The bad news: I don't have a lot of photos of those. One thing I can tell you: they are 100% more awesome than the store-bought ones, and we regularly have people tell us that they come to our house on Halloween just to see them. We also have people slow down just to look at them, kids pointing out the window. The picture above is probably the second year we did them, and they are pretty rudimentary. As with most things, we get better and better at them every year.

I have big fantasies of scarecrows to come: an alien theme, separate costumes just for Halloween night, the band KISS (I had to give that one up once we passed the four band members by in numbers), The Wizard of Oz...I mention this only as an encouragement to others who might have time to get more elaborate in their concept of the scarecrow. I've also thought a family of mummies would be fun. Pirates, the characters for the tv show 'Arthur', well, okay, I'll stop now.

This year, we're doing a 'Day of the Dead' theme. I've had a fascination with Mexican folk art since high school or college, and have been known to set up Day of the Dead altars, most notably when a beloved family member has passed during that year. I love the spirit of celebration of loved ones, the sense of humor with the skeletons doing every day acts of ridiculousness. I enjoy the reminder that we are all just passing through this life, and the veil between us and 'them' is mighty thin.

I  encourage you to embark on this scarecrow-making journey- be it by yourself, with your kids, even dragging your husband or wife kicking and screaming along with you (guess which one I am). It's easy. And did I mention how cheap it is? I have a rule that I use as much 'found' stuff around the house as I can- and random wood from the garage. This year my grand total for 6 scarecrows? Less than $5.00. If you own a glue gun, you're halfway there.

Next up: detailed instructions for scarecrows, plain, Day of the Dead, or any variety you please.

Saturday, October 2, 2010

Post Office Creative Play Center

We have a sometimes-unused corner in our project room, aka schoolroom. I like to fill this space with creative play centers- a florist shop, an ice cream shop (thanks to my friend Grace who brought over all the stuff from the ice cream shop that SHE made), an arts-and-crafts area with DIY supplies for little kids, a valentine-making center, the list goes on...

One of the perennial favorites is the mail center. I assemble the supplies, and they go to town. A center like this takes some prep work, although not too much time to assemble. It can also be left up for weeks before the kids get tired of it, and kids of all ages enjoy it. Everyone from the 1 year old to the big 2nd grader spends plenty of time in there.

First necessary item is a table/place for the kids to 'work'. You don't necessarily need chairs, as postal workers are up on their feet- and no chairs saves space for more kids to get in there. I like to set our table up with blank envelopes, envelopes I collect from junk mail, paper for writing letters, postcards, pens, pencils, squarish stickers to use as stamps, stamps and an ink pad for 'cancelling' the mail as it comes through, a scale and cash register for customers who may happen through to mail stuff. Also fun would be little boxes wrapped up to mail, padded envelopes, etc.

* A great activity for bigger kids, here, would be to make a basket full of envelopes and a how-to on addressing envelopes, writing a friendly letter with appropriate headings, etc...


 This is our mail sorter. Most of the time they just stick the letters, etc. in there randomly, but if you wanted to make mailboxes for family members, it would be easy to affix photos of your family on the individual slots, make a letter, color, number sorting center (tape the colors/numbers/letters on pieces of mail with packing tape and make a slot for each on the sorter). If you don't have one of these, I was thinking cereal boxes with the flaps cut off and taped together would make a good, cheap DIY version. I set this sorter on a small table (right now it's on our piano bench) so it's the right height for little people to stand up and sort the mail.
                                                                                   
This is similar to the one I have, although a bit smaller, it looks like. Also much cheaper, but I bought mine years ago when I was teaching school to use as cubbies for students' papers to take home. This would be a great find at a yard sale or thrift store!

I found this really great wood mailbox, made by Melissa and Doug, a few years ago. It's a set that comes with wood letters, postcards, and stamps that stick on with velcro. It also has a key to open the mailbox- fun! We use it with its intended items, but also as a 'receiving' mailbox in our mail center for everyone to put their mail- and then they get the fun of sorting it, stamping it, and placing it in the appropriate mailboxes. Amazon sells this set! We bought ours at least 5 years ago...and this is actually way cheaper than what I paid at the fancy schmancy teacher store.


Finally, a few supplies to gather around the house:
-envelopes/address labels/little pads of paper out of junk mail. This is the one time in your life that junk mail could be described as 'an awesome resource'.
-Tape dispenser/stapler/pens/pencils/stamps/stamp pad/square stickers to use as 'stamps'.
-some sort of bag to use as a mail carrier's satchel.
-costumes would be fun here! some hats, maybe a blue vest or two. I haven't ever done costumes, but I'm sure my kids would love it.


Happy Stamping!


In Search of...

I always loved that show when I was a kid, for some reason. Leonard Nimoy (hey! where are his pointy ears?!?) with his resonant voice, looking for elusive phemomena. I think the last time I watched this show I was maybe ten years old, and I distinctly remember loving the Loch Ness Monster and Bigfoot episodes. Today, however, I am in search of the elusive homemade Pumpkin Spice Latte recipe that tastes JUST LIKE STARBUCKS. I put this in all caps because it's really imperative that it taste as close to the beloved Starbucks' version as possible. My friend Eilyne requires it.

 Eilyne has embarked on a most interesting journey. She has vowed to give up Starbucks for 100 days. That's right. 100 days. And she writes a fascinating, funny, heartfelt blog about her journey, which as it has turned out, really is only partly about giving up Starbucks. She had a very good reason for doing this, which you can read all about if you look at the very first post, some 75ish days ago (see  link to her blog to your right).  And Eilyne and I have a few things in common. She happens to be married to one of my really, really good friends from junior high and high school. We both have more-than-the-average number of children by today's standards, so we can commiserate about the three ring circus that is currently our lives. Finally, and most importantly, here, is that we both love the Pumpkin Spice Latte from Starbucks.

So, when I started thinking (well, fantasizing) about the this year's impending release of the PSL a month or so ago, I got really concerned about Eilyne. How would she handle this?  She's so close, she can't give up her quest now! So I got cracking with the google search and came up with a few recipes for the PSL. I passed one along to Eilyne, and my testing of one of the other ones is below.

I thought this recipe was really, really good. Is it EXACTLY like Starbucks' recipe? Nope, not quite. But very good, yes. Perfect for my preschool co-op group; we mommies like to drink coffee while we're chasing, teaching, reading and playing. So I highly recommend you give it a shot.  You can find the complete recipe at thekitchn.com, here.

Now, I'm not much of a recipe cook. I get more of a feel for a recipe, and then I go for it. The same with this. I didn't bother putting it in the blender; I just whisked the mixture while it was on the stove heating up, and it was plenty frothy. I also made my own pumpkin pie spice blend of ginger, nutmeg and cinnamon, which was great.

So, try out the recipe on a cool Autumn morning (or afternoon!), and then hop on over to my friend Eilyne's blog, read her post and try out her recipe, here .

Cheers!